No products in the cart.
Installation, Maintenance, and Repair of a Garbage Disposal
12 Steps to install your garbage disposal
When it comes to realizing the kitchen’s real heroes, apart from the person who uses the kitchen to cook some fantastic and mouthwatering food, it is the garbage disposer.
They are also known as food waste disposer and are an essential item of every kitchen as they help you get rid of all the waste materials and leftovers in the blink of an eye. Many people do not even think as highly of them unless they can install it in their place. Then only they are indeed able to appreciate the working of this essential kitchen tool.
This food disposer easily and without any hassle, breaks down every undesirable food of the kitchen regardless of whatever it is. But one thing that homeowners who have garbage disposers installed at their places in their kitchen need to take care of is its maintenance. It can do it by restricting oneself not to feed such items to the disposer that it is not easily able to break down or those that have a high chance of getting stuck in its pipes and housing.
For this, you would then require the help of some tools and cleaners that can help you unclog a clogged kitchen sink drain or disposer. But there are many people to whom this question first comes to their mind before they start the cleaning process that does garbage disposal cleaner work? Well, many of these cleaners and their supporting tools and equipment are available in the market and the retail stores that can help you get the job done.
However, there are times when even the garbage disposal cleaner or the effort you put in cleaning the disposer with the help of some cleaning equipment cannot bring back the disposer to its proper functioning. Experts in this field have identified as replacing the old disposer with a new one. Installing it in the best possible way either on your own or with the help of some plumbing services whose employees are experts in their field and know the technicalities involved.
Here in this article, we have discussed and listed some of the necessary steps to follow if you want to wire, install, or even replace your garbage disposer. But before you start with the step-by-step process, there are two things you need to make sure are in place. One is that you have an available outlet. This outlet needs to be supported by a 120 volt, 20 amp circuit breaker but ensures that the power shut off while cleaning or replacing the garbage disposer. Another point that you need to work on is that you have the required tools with you. These include screwdrivers, hammers, plumber putty, putty knife, wire strippers, pipe wrench, wire nuts, electrical tape, buckets, and rags or towels.
Once the proper outlet and required tools are in place, you can start with the process, which is as follows:
Step # 1
There are always cleaning items placed under the sink by many households as they find it the most feasible place to store them. Before you start to uninstall and replace the old disposer with the new one, you must make some space for yourself under the sink so that there is sufficient room for you to operate and carry out the technical task. Now you need to disconnect the strainer and the waste drain lines and remove them from their place.
Step # 2
As you remove the line, there is a possibility that some water had accumulated, which would then drain out once it will remove the pipe. As a precautionary measure, place a bucket under the sink and some rags and towels nearby, which can absorb any splash of water, and then remove the waste lines. To avoid the smell of wastewater, you can ask some experts about how garbage disposal cleaners work for this place. And if they work well, you are useful to clean the area before moving on to the next step.
Step # 3
Once you should remove the lines, you now need to remove the large nut that secures the strainer and works as a mounting assembly after the nut released with the tools required to remove the strainer.
At this step as well you need to make sure that the area is nice and clean, and you can make use of garbage disposal cleaners that are effective for situations like these, which would help answer your question of doing garbage disposal cleaners work in such a case?
Step # 4
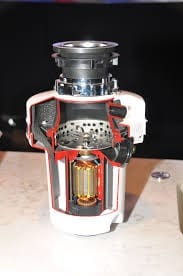
Take your new garbage disposal unit, open it, and get it ready for installation at this new clean place. You need to first start with a mounting assembly and a sink flange.
Upper and lower mounting rings are available on the mounting assembly and have mounting bolts that allow it to get connected to other surfaces. Take a quarter-inch coil of putty from your plumbers putty and place it carefully around the drain. Now in the gutter, place the sink flange and press it down carefully.
Step # 5
Once the sink flange should place on the putty, find the new garbage disposal unit’s gasket and mounting ring. Place these two items on top of the flange and push them inside. A snap ring that comes with the team then used to connect everything, the gasket, and the rings, t the flange, which will keep everything in place.
Step # 6
After everything is in its proper place and tightened by the snap ring, the next thing is to pull the mounting bolts. Ensure that all the bolts, mostly three of them, should be drawn at alternate turns to evenly each one of them.
During the tightening process, it is common for the putty to come out a little bit. There is nothing to worry about and wipe it away with a piece of cloth or rag.
Step # 7
Since everything has attached, now comes the turn of the wiring. Remove the cover plate of the disposal so that the wiring is easily accessible. The wires are standard in white and black, which needs to connect to the same color wires in the power supply. Now push inside the supply wire, and the electrical cover plate of the unit needs to replace.
Step # 8
It is an extra step for those who have a dishwasher near the place that works on the same supply plug. On the side of the disposal near its top, you are likely to see a close-ended tube. This tube is the line where the inlet line of the dishwasher is connected. With some tools, a screwdriver, and a hammer, take out this line plug. There is a high chance that as you are taking the plug out, it may fall in the disposal, so make sure you take it out before moving on to the next step.
Step # 9
After the dishwasher’s line plug has been taken care of, you are now ready to mount the disposal. The mounting assembly has locked with the help of three tabs that are present on the removal. Lock these tabs once they are in place.
Now shift the disposal a little bit as even after locking, it would remain slightly loose. You do not need to worry about it. Should turn the removal in such a way and in that particular direction of water pipes and the discharge tubes are lined up with each other.
In case there is a dishwasher that is also on the side of disposal, connect the drain line to the inlet port. For sinks with a double bowl, they might face a slight issue as the J trap will not line up perfectly with the disposal.
To make the connection fit properly, use some PVC pipes, and don’t forget to slide the lock nut on the tube before the nylon washer.
Step # 10
It is the step where your installation process has started to almost come to its end-stage. As far as the plumbing is concerned, it is all connected. You need to make sure if all the nuts and bolts that connect these pipes and plumbing are tight enough and that the disposal line is secure.
Near the mounting assembly, there is a rotating cam collar. Should tighten the collar with a wrench or screwdriver’s help before the garbage disposer turned on for testing. Also, ensure that the place is neat and tidy and ask that do garbage disposal cleaners work in conditions where the disposal is still a new unit and hasn’t use before.
Step # 11
Finally comes the stage where everything is in place and locked in its correct position. To be a hundred percent sure about it, you need to test the new unit and the handy work you’ve spent so much time and effort. Turn on taps and let the water flow down through the sink and into the disposal and the drain.
Check the following of water under the sink for any possibles leakage or defect unit. Those who have a dishwasher connected to the same supply plug suggested that you turn that on too. It is necessary to check that there is no problem between the connections between the two items.
If any problems or issues come, then tighten up those problem areas to ensure that everything stays dry as the two units are running. Since both teams run on electricity, it is of utmost importance that this area remains dry as there is a risk of electric shock or a short circuit, which could lead to much more significant damage that your house and the people living in it might be facing.
Step # 12
After having complete surety about the unit in terms of leakages and electricity and supply plug issues, it is time for you to restore the power to the outlet under the sink. Plugin the disposal and turn the water on again as it needs to be running while you flip the switch.
One advice that every other knowledgeable person in this field and we would give you regarding the use of garbage disposers or food waste disposers is to keep the water running and flowing through the sink into the disposer as you use the disposer at the same time. It allows the disposing of and washing away of any discarded material in a smooth a clean way.
Also, even when you are ready to use the garbage disposal, then it is suggested that you let the disposer and the faucet running. This action allows waste to get stuck into the pipes and drains to get further pushed away into the housing. Doing this would help you keep your disposer clean at all times and increase the unit’s life.